
How to convert my Netlink router to a wifi extender or repeater?
In this blog article, we describe how to convert the Netlink HG323DAC modem into a Wi-Fi extender or repeater by connecting it to the primary router.
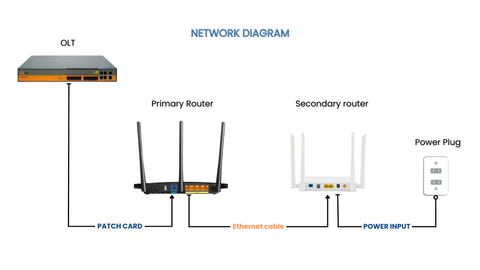
This network diagram illustrates how it was connected to function as a secondary router or WiFi extender.
1.1 CONFIGURATION OF PRIMARY ROUTER
Step 1: Connect the Primary router to the OLT Switches through a patch card and configure it. If you have TP-link, Netlink, Syrotech or any related routers, kindly refer our video.
Note: If you have already configured your primary or Main router then skip this step.
1.2 CONFIGURATION OF SECONDARY ROUTER
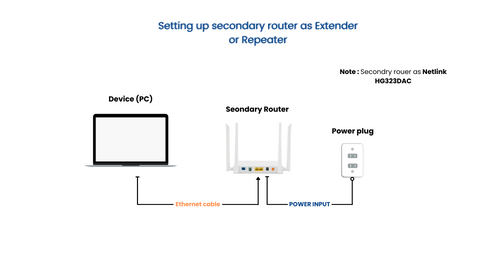
Step 2: Connect the secondary router (NETLINK HG323DAC) to PC/laptop via ethernet cable. One end on the PC/Laptop and the other end to the secondary router as shown in the below diagram:-
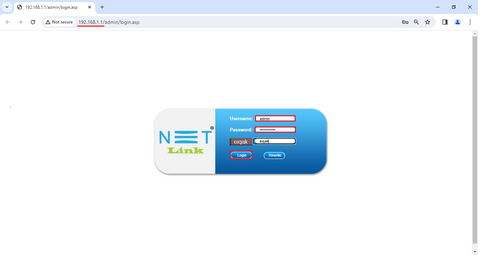
Step 3: Once connected to the device (laptop) then disconnect your network connection on the device. After disconnecting, enter the Secondary router’s IP Address as 192.168.1.1 in the web browser (i.e. Same IP as the primary router you configured). Then enter the default username and password along with the verification code and click login.
For Netlink HG323DAC modem, the default Username is “Admin”, and the Password is “stdONU101”.
Step 4: Once login, reset the password as per the criteria and confirm it. Next, do router re-login with new password.

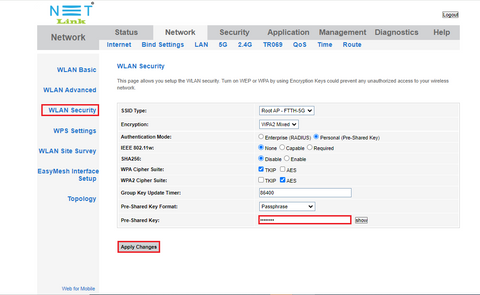
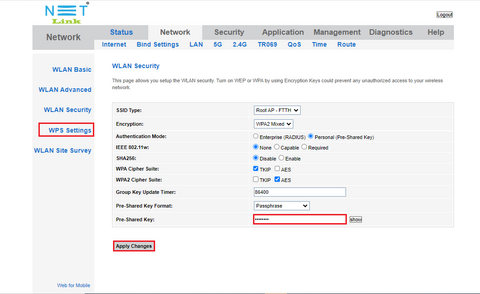
Step 5: On the Router dashboard select the “NETWORK” >> 5G >>WLAN Basic “, change SSID (WiFi Name) and choose the channel width (20/40/80 MHz) needed then click apply changes. Move to the WLAN security and change the pre-shared key (Password) as needed. Then, Click Apply changes to save the settings.

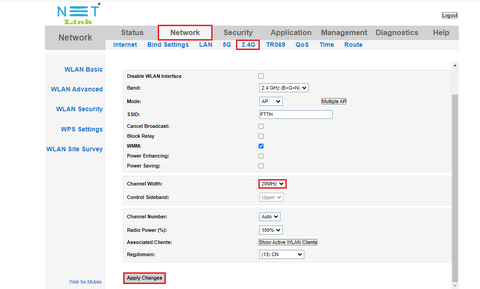
Step 6: Next, Select “ 2.4Ghz >> WLAN Basic “ to change the SSID, select the channel width for the 2.4 Ghz band as (20 /40 MHz) and click apply changes. Alike 5 Ghz, move to the WLAN Security and change the pre-shared key for the 2.4GHz band. Once done click Apply changes.
Step 7: Follows, click “LAN >> LAN Setting” and change the IP Address from 192.168.1.1 to 192.168.1.254 (i.e. 1.254 is an empty port on the primary router). Select “ Disable DHCP Server “ preventing from auto-assign of IP, Configure, and other network parameters. Click Apply changes to save progress.

Fig 5 - Setting up LAN IP and disabling DHCP server
Step 8: Once saved, it goes offline and connects the ethernet to the primary router, on the device (PC/laptop). Now, on your WiFi list, you can see the configured WiFi network.
That’s it. Now secondary router such as netlink HG323DAC acts as a WiFi extender or repeater and functions with a faster network connection.


